YouTube is arguably the most popular video streaming/sharing website in the world today. You can find pretty much any video you want, be it videos of the current music chart topper or those classic videos of yore. You may wish to download your favourite videos from video streaming websites and perhaps even burn the videos onto a DVD for playback on your DVD player (DVD Authoring). YouTube and other streaming video websites don’t provide options to download the streaming videos. However, there is a myriad of software tools out there (both free and paid) that make the download and burn tasks very straightforward. Given below are the steps I used to create a DVD-Video containing 30 of my favourite YouTube videos:
STEP 1: Install a Download Manager
In order to download streaming videos, you must install a download manager. I’ve tried the following download managers:
(1) Orbit Downloader: You may download and install Orbit Downloader from here. After installation of Orbit downloader, if you visit a streaming video website and hover your mouse over the streaming video, you will see a drop-down as shown in the image below:
Clicking on the GetIt button or using drop-down options like “With Grab++” will start downloading the streaming video.
(2) RealPlayer SP: You may download and install RealPlayer SP from here. After installation of RealPlayer SP, if you visit a streaming video website and hover your mouse over a streaming video, you will see a "Download This Video" drop-down on the upper right corner of the video, as shown in the image below:
Click on the “Download This Video” button to start downloading the streaming video.
Which download manager do I use?: I used Orbit Downloader to download the 30 YouTube videos. However, having been introduced to RealPlayer SP recently, I recommend you use RealPlayer SP, because as per my observations, it has advantages over Orbit downloader in the following areas:
(1) Speed: RealPlayer SP downloads streaming videos faster than Orbit downloader, though not a significant difference.
(2) Compatibility: RealPlayer SP downloads streaming videos played in the popular browsers (Mozilla, IE, Chrome) whereas Orbit Downloader does not work with Chrome.
STEP 2: Install a DVD Authoring tool
In order to burn videos onto a DVD in DVD-Video format, you must install a DVD Authoring software. I used a free, easy-to-use DVD Authoring software called DVD Flick, which you may download from here and install.
STEP 3: Download streaming videos
Having installed the required software, you may now proceed with downloading your favourite streaming videos. To do so, play the streaming video and use the buttons (Orbit Downloader or RealPlayer SP) to download the streaming video. When saving the video, ensure you save it in an appropriate format. Visit here to check the video formats supported by DVD Flick for creating a DVD-Video. For example, on YouTube, videos are typically available in flv (flash video) and mov (QuickTime movie) formats, both of which are supported by DVD Flick. I downloaded standard quality (SQ) YouTube videos in flv format and high quality (HQ) YouTube videos in mov format (renaming .mov to .mp4, as Quicktime and MP4 are interchangeable).
STEP 4: Create a DVD-Video
After downloading your favourite videos, you can burn them onto a DVD for playback on both hardware and software DVD players, with features such as menus and subtitles. Here’s how you do it:
(1) Insert a blank recordable/rewritable DVD in your computer’s DVD drive and launch the DVD Flick software.
(2) Click on “Add Title” in the right-menu, select all the videos you wish to burn and then click the “Open” button. This will load all the selected videos into the project window. You may choose to save this project for later burning or just proceeding with the next step.
(3) Click on “Menu Settings”, choose a Menu and click “Accept”
(4) Click on “Project Settings”, set various options including “Burning” (which tells DVD Flick to burn the DVD after converting the video files into DVD-Video format).
(4) Click on “Create DVD” and select a project destination folder (if prompted).
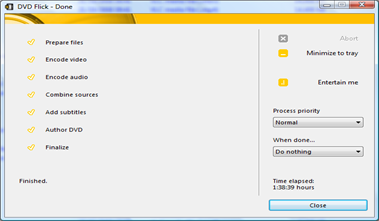
After completing the steps above, DVD Flick should commence the process of encoding and burning your DVD-Video. A successful completion should resemble the image below:
It took 1 hour and 38 minutes to encode and burn my 30 favourite YouTube videos onto a 4.7 GB DVD. The resulting DVD-Video occupied 4.3 GB. The DVD played fine in my software DVD players such as Windows Media Player and VLC Media Player, but unfortunately exhibited sync issues (audio out of sync with video) when played on my hardware DVD player. However, until I test the DVD on another DVD player, I will assume that the sync issues are caused by my cheap Alba DVD player.

