The Nutanix HCI platform provides basic self-service capabilities for users via its Prism Central management application. For advanced self-service capabilities (applications/DevOps), Nutanix will strongly recommend that you purchase CALM, their Cloud Automation and Lifecycle Management product. While my basic interaction with CALM made me aware of it’s capabilities with Blueprints, etc. , I wanted to extract the most out of Prism Central without CALM, as my organization hadn’t purchased CALM. As we were moving our development environment from traditional infrastructure (siloed compute/virtualization/storage) to the Nutanix AHV HCI platform, I wanted to introduce Self-Service Virtual Machine (VM) provisioning for end users (developers and other IT admins). On the traditional development environment, if a developer required a VM, they would have had to raise a Service Request, get it approved, get it provisioned by IT admins (who in turn have their own processes) and eventually get the VM after anywhere from a couple of days to a week. So, with the move to Nutanix AHV, apart from the benefits to the Infrastructure Admins (easier upgrades, etc.), I wanted some tangible benefits for the end users. My team had already been hosting a self-service VM provisioning environment on Red Hat Openstack, but that environment was solely used as a Lab, as we expected challenges in the administration of that environment if used as a Lifecycle environment (DEV/QA/PROD).
So, my objectives for this new Development environment were:
-
Provide a very simple (minimum mouse clicks on the UI) self-service VM provisioning workflow
-
Allow for multi-tenancy for different Developer teams using Nutanix Projects
-
Automate the customization of the deployed VM ensuring that enterprise requirements are met and the user can login upon completion of VM provisioning.
Out of the Box, Prism Central provides simple workflows for provisioning VMs from VM templates (also referred to as Catalog Items or Marketplace Items). However, based on our experience with our self-service Lab, we’ve observed that the more the end users need to do (execute a script, create user/password, provide keys, use cloud-init), the more support calls we receive. I’m not painting all end users with the PEBCAK brush, but it’s a challenge to find the optimal UX to cater to both beginner and advanced users. So, I decided to start with a simple workflow (as per objective #1), get end users used to the new self-service features and then enhance the self-service capabilities to meet the requirements of advanced users.
Implementation
Multi-Tenancy Setup
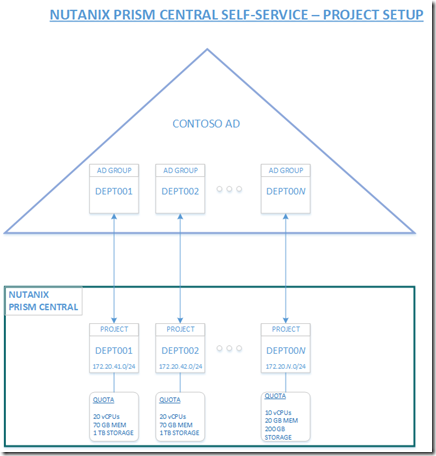
- In order to provide resource quotas for different Application teams, each team was assigned a Nutanix Project (Tenant) with a specific resource quota (vCPUs/Memory/Storage).
- Every Team’s users were members of an Active Directory Group bearing the same name as that of the team’s Nutanix Project.
- Every Nutanix Project had a corresponding AD Group assigned to it for authentication with one of the built-in roles (Consumer, Developer, etc.) used for authorization.
- Every Nutanix Project had a dedicated /24 network, with IP assignment leveraging a Nutanix DHCP pool.
VM Customization
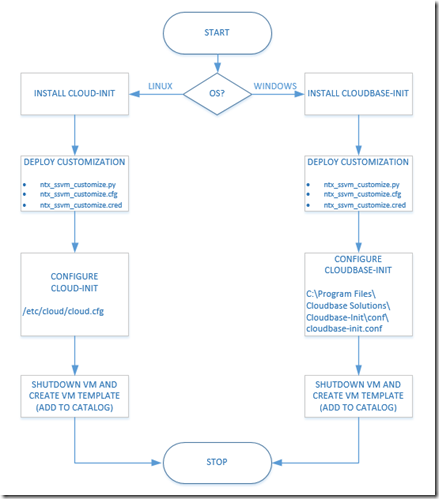
A bespoke customization script was used to customize the VM upon deployment. This script had to be burned into the VM template and required cloud-init (Linux) and cloudbase-init (Windows) to be installed.
Refer my GitHub repo for more details on the customization.
Catalog Publishing
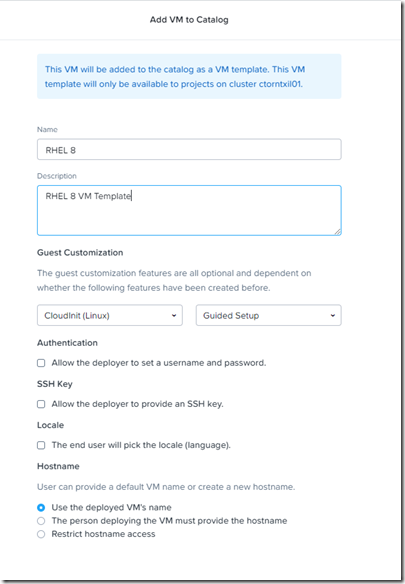
After creation of a VM with the customization burned in, add it to the catalog to create a Catalog Item (VM Template). For both Linux and Windows VMs, use the cloud-init (Linux) guest customization as shown in the image below.


A stupid question. The *.py, *.cred and the *.cfg files – were do I put them? On the VM under C:\Program Files\Cloudbase Solutions\Cloudbase-Init\LocalScripts?
Johan, sorry for my late reply. For what it’s worth now, you’re correct. As per the sample-cloudbase-init.conf, the .py/.cfg/.cred files are located in the LocalScripts folder as defined by the local_scripts_path variable.